

It’s hard to make a list of the best things to do in Japan, because there are just so many cool and fun activities in this country.
Every island in Japan is interesting, but as a first timer, many of the best sights and activities for tourists are in the cities of Osaka, Kyoto, and Tokyo.
There’s a huge variety of cultural attractions here, both old and new. You can ride a futuristic bullet train through the city and then explore an ancient temple or Samurai castle in the same day.
We’ve visited Japan a bunch of times over the years, but it never gets old. It’s one of our favorite countries in the world to travel.
Read on for some of our top ideas of what to do in Japan!
Best Things To Do In Japan
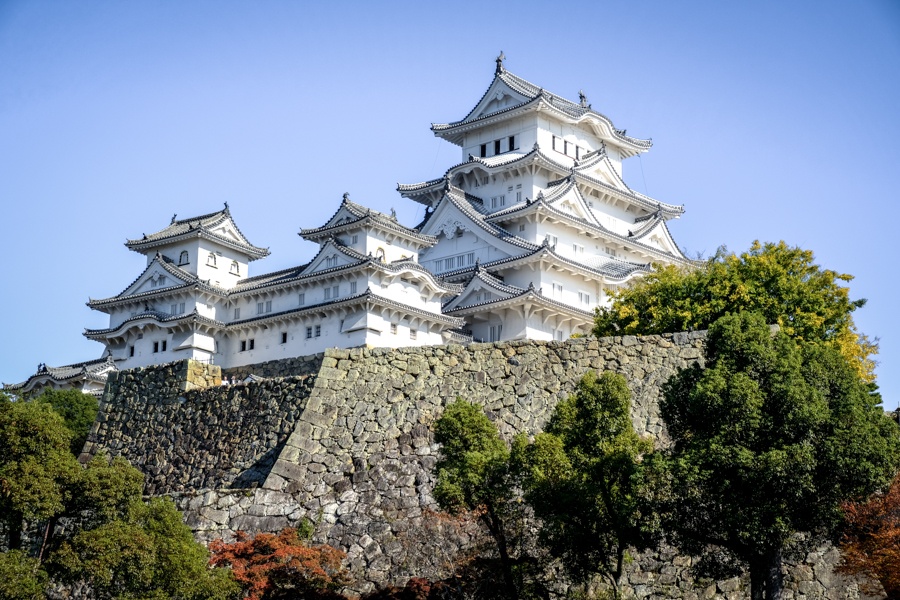
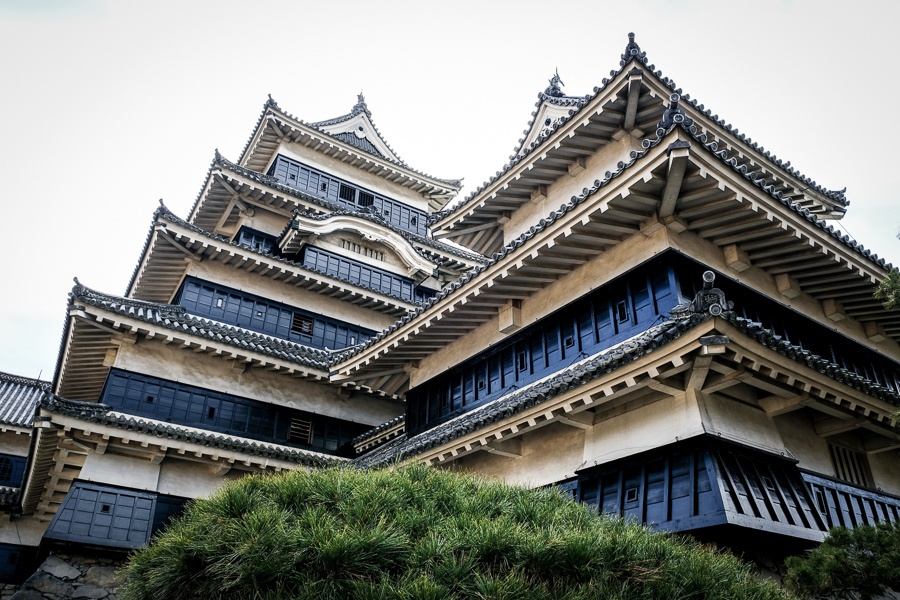
1. Visit The Samurai Castles
Japan has lots of castles left over from its medieval period, when Samurai warriors ruled the land. These fortresses are impressive works of art and they can be fascinating to explore.
There are a bunch of these Samurai castles scattered across the country, but two of the top ones to see are Himeji Castle (near Osaka and Kyoto) and Matsumoto Castle (near Tokyo).
This is hands down one of the best things to do in Japan, and it’s pretty budget friendly!
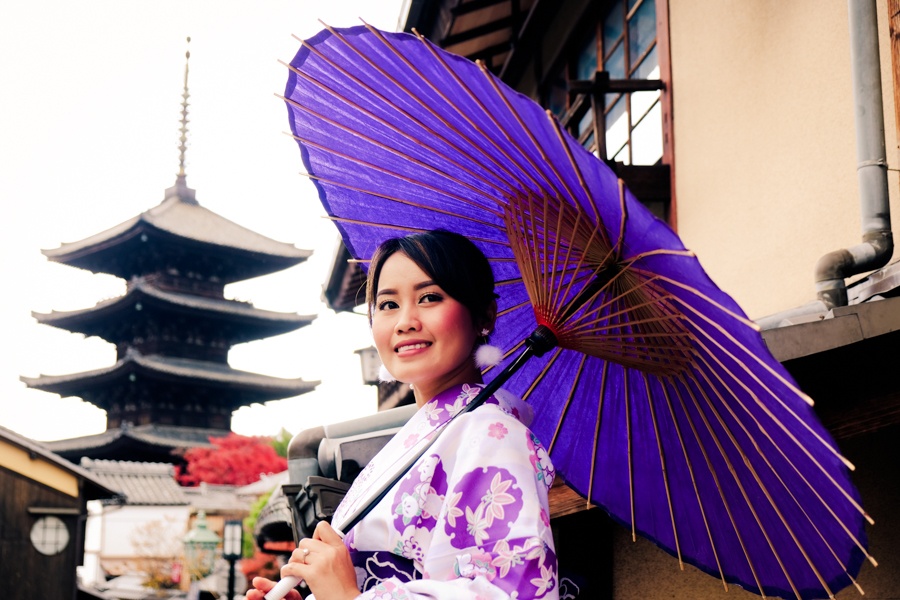
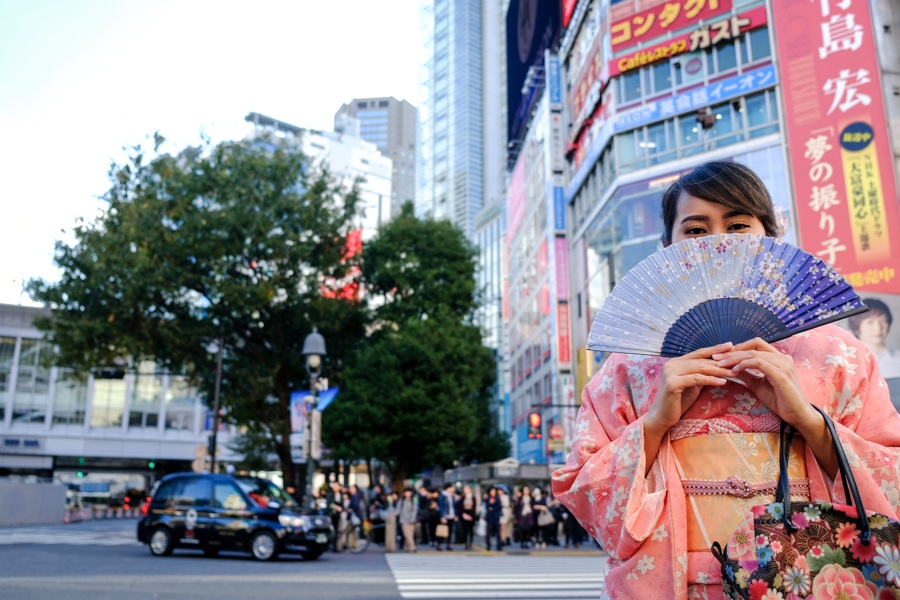
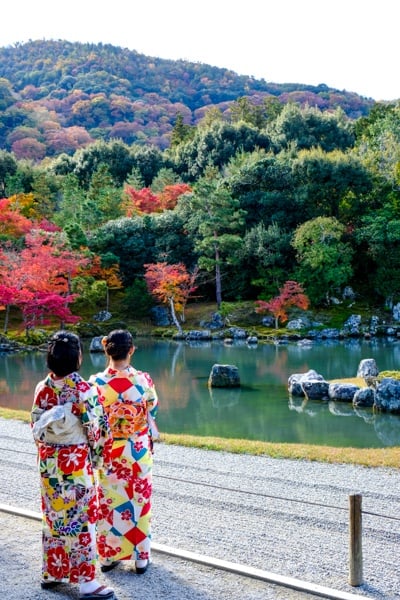
2. Wear A Kimono
There are lots of kimono rental shops in Japan where you can try on the country’s famous traditional dress for a day.
My wife rented a kimono in Tokyo and we headed over to the famous Shibuya Crossing — perfect photo spot! We also did a kimono rental in Kyoto, which is loaded with great photo spots because of all the temples and shrines.
If you ask the locals, they aren’t offended at all by foreigners wearing the kimono. It’s a popular tourist activity here, and Japanese people like to see others enjoying their culture.
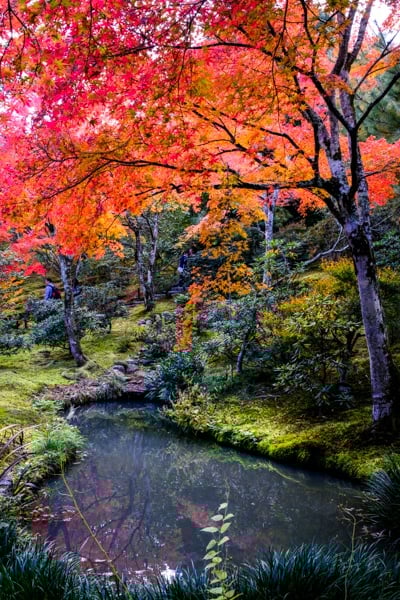
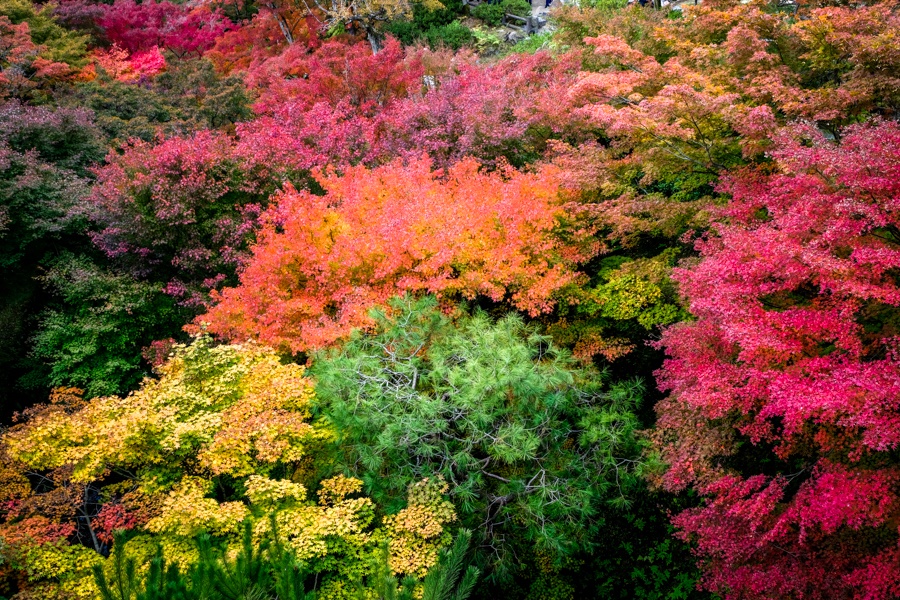
3. Stroll A Landscape Garden
Japanese gardens are famously pristine and photogenic. There are lots of them all over Japan, and they’re great for a relaxing walk.
The gardens are nice year round, but they’re especially scenic when the fall colors start (usually in November). It’s one of our favorite activities in Japan.
The pictures below are from the garden at Tenryu-ji Temple in Kyoto.
4. Join A Tea Ceremony
As you may already know, tea is a big deal in Japan, so it can be a fun cultural experience to join a Japanese tea ceremony!
This is an important traditional ceremony that takes place on a tatami (floor mat), and a lot of preparation goes into it. The tea ceremony is full of artistic detail. For Japanese people, it’s meant to represent purity, tranquility, respect, and harmony.
Even if you’re not really a tea lover, it’s a good dose of Japanese culture and history. Some places also let you rent a kimono to wear as an add-on, making the experience even more immersive and unique.


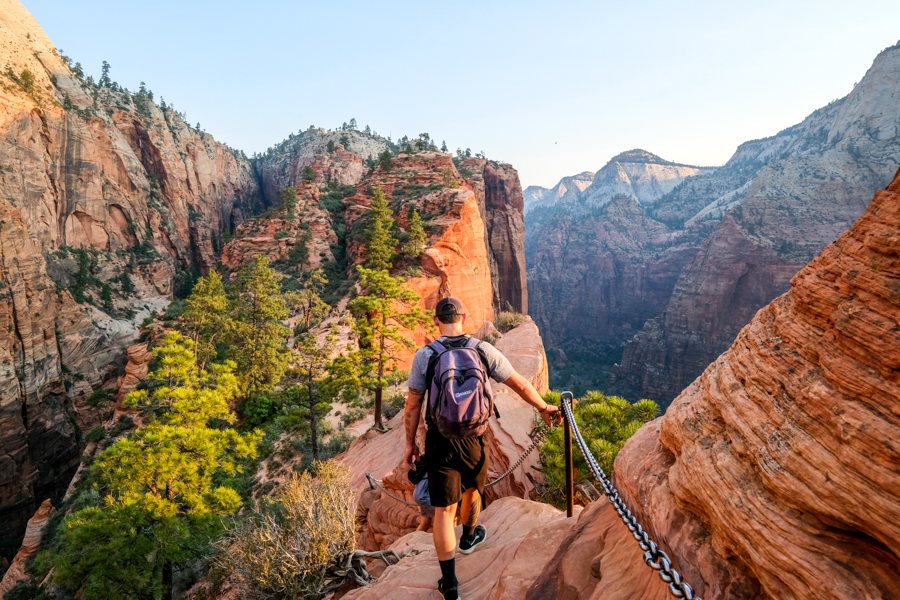
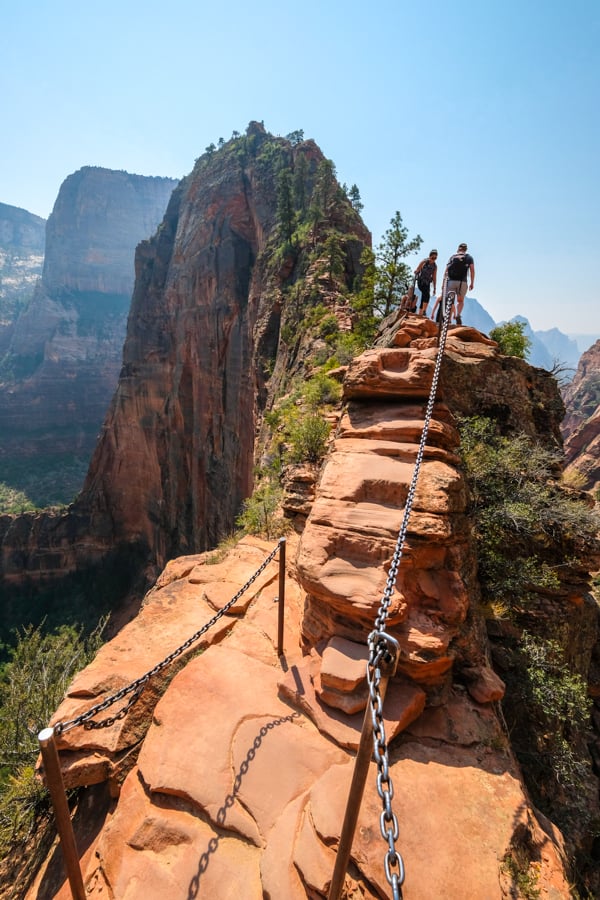
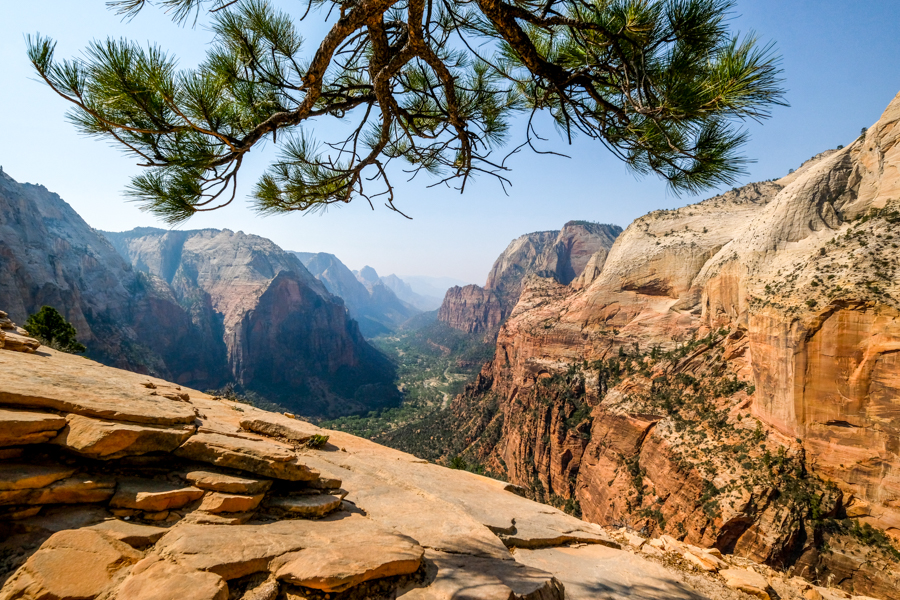
The infamous Angels Landing hike in Utah is an epic and scary trail that draws many thousands of hikers every year to the Zion National Park.
This is a hard hike that takes you up the side of a steep sandstone mountain, with chains to grab onto for safety, and amazing views of Zion surrounding you on all sides.
The chain section of Angels Landing is noted for being especially hair-raising and hazardous, and there have been a number of falling deaths on this hike over the years, although it’s plenty safe if you’re careful.
Permits are required since 2022, and you can apply for them via a lottery system conducted by the National Park Service, or else you can book a guided hike that includes permits.
I wouldn’t say this trail is for everyone, but if you enjoy adventure, photography, and a good adrenaline rush, then definitely add it to your bucket list!
This travel guide for Angels Landing will explain how to get permits, where to find the trailhead, how to do the hike safely, and everything else you need to know before you go!
Quick Stats
- Distance: 4.5 miles (7.2 km) round trip
- Elevation Gain: 1,500 feet (460 m)
- Top Elevation: 5,790 feet (1,765 m)
- Duration: 3 – 6 hours
- Difficulty: Hard
Angels Landing Hike: What To Expect
Angels Landing is a scenic trail that takes you out of a canyon and up a steep mountain ridge, where you have to hold onto metal chains for safety.
This is an extremely popular trail, and Zion National Park is a very busy place in general, but the crowds are a lot more manageable now that permits are required to do the hike.
It’s a safe enough hike if you’re careful, but I wouldn’t recommend it for young kids, unfit older folks, or anyone who is not surefooted and comfortable with heights. People have died on the chain section of Angels Landing.
The details below will explain each part of the trail and what to expect. This entire hike is so worth it!
• First Switchbacks
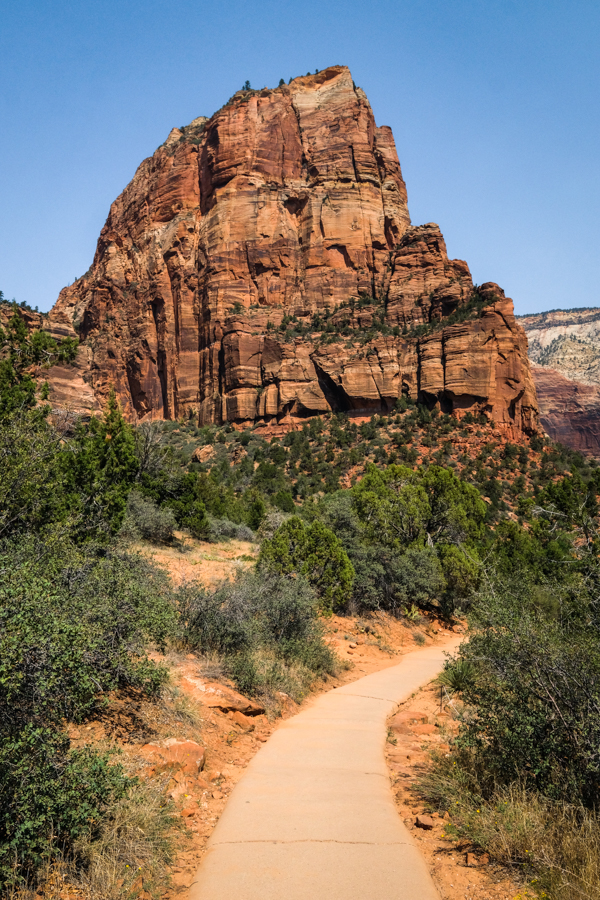
The Angels Landing hike starts out on a flat, paved path at the trailhead, but quickly starts to gain elevation right after you cross the bridge over the Virgin River.
You’ll spend the next mile on these switchbacks. There’s no shade at all to protect you from the sun, but the path is wide and the canyon views are already amazing.
At this point, you can already see the massive peak of Angels Landing towering in front of you. Yikes! As you keep climbing these switchbacks, your views of the Zion canyon only get better by the minute.

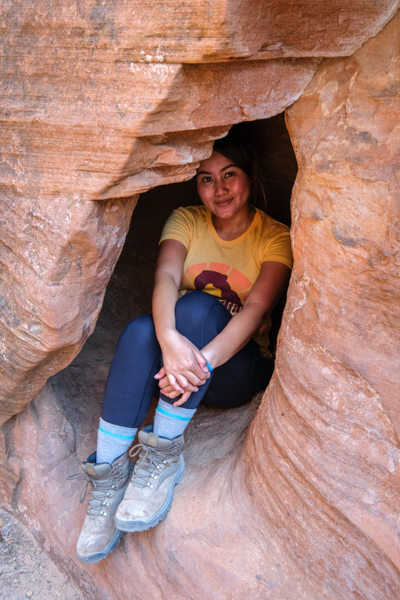
• Refrigerator Canyon
After trudging up a mile of very exhausting switchbacks, you’ll arrive at Refrigerator Canyon, which gets its name from the nice, cool temperatures in the shade.
The path flattens out a bit, and it’s a great chance to catch your breath after the initial switchbacks. We even found a neat little cave with just enough room for a person.
Refrigerator Canyon is one of the only places in the entire hike where you get any shade, so enjoy it while it lasts.

ASIABaliBeachesBucket ListEast Nusa PenidaIndonesiaNorth Nusa PenidaNusa PenidaSnorkelingSouth Nusa PenidaTravel GuidesWest Nusa Penida
NUSA PENIDA ISLAND GUIDE FOR BALI
The beautiful, exotic Nusa Penida island lies just 25 kilometers from Bali, the most famous tourist destination in Indonesia.
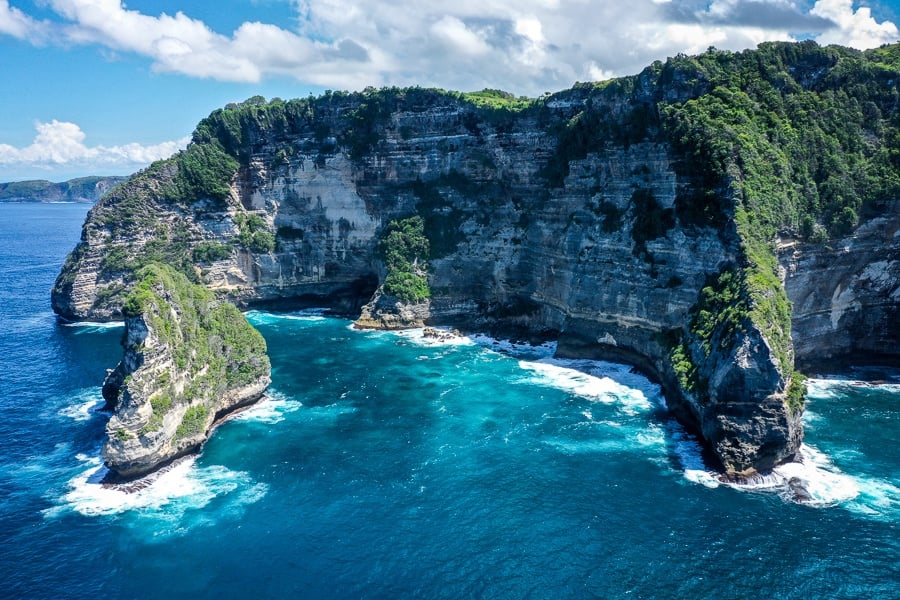
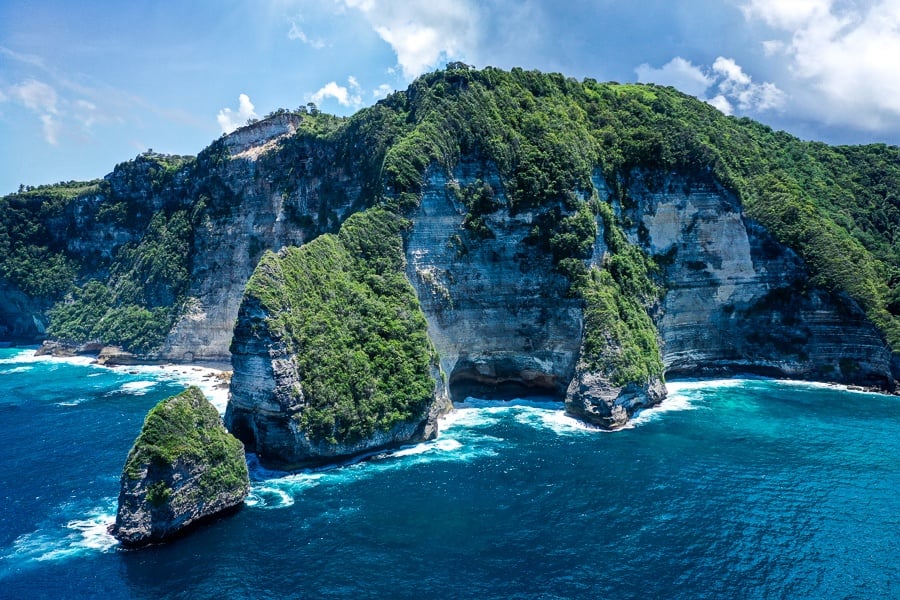
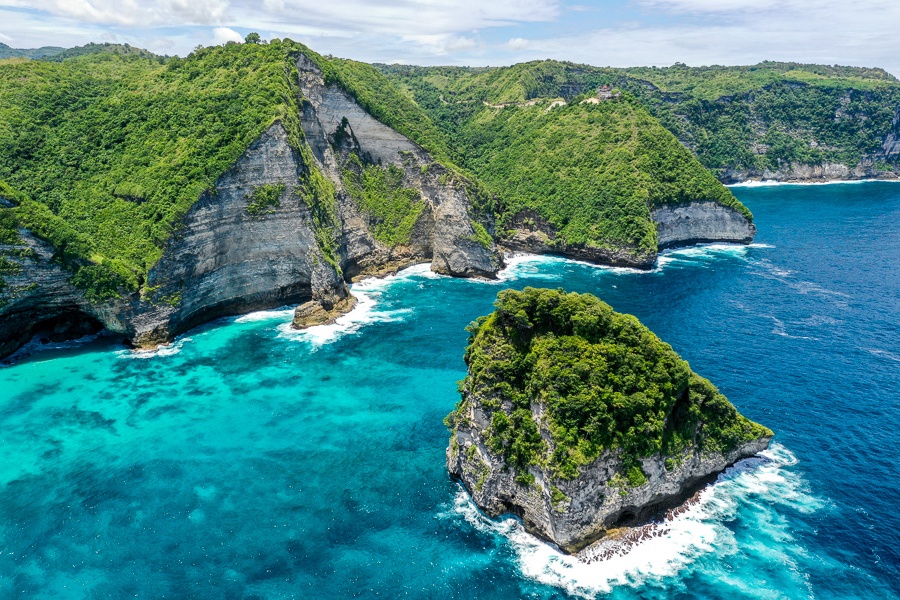
Nusa Penida is a much smaller island than Bali, but it has some of the most amazing scenery in the entire Bali province (which it’s part of).
I’ve visited Penida dozens of times over the years, but it never gets old. This island is definitely one of the most beautiful places to visit in Indonesia.
The island can be visited on a day trip from Bali (same day return), but I think it’s better to stay and spend at least a few days sightseeing. There are so many good photo spots, hikes, and other things to do in Nusa Penida!
This travel blog will explain what to do in Nusa Penida, how to get there, where to stay, best transport options and tour packages, and some of the top sights to see. I’ve also included a handy map of the island for planning your trip!
Nusa Penida Day Tour Packages
First of all, if you’re on a tight schedule or want to skip the extra steps involved in arranging your own trip to Nusa Penida, GetYourGuide has prearranged day trips to Penida, complete with hotel transfer, fast boat tickets, island tour, and same day return to Bali.
These tours visit some of the top sights in Nusa Penida island, including Kelingking Beach, Broken Bay, and more. We’ve used GetYourGuide for lots of day tours and activities around the world, and they’re great! Highly recommended.
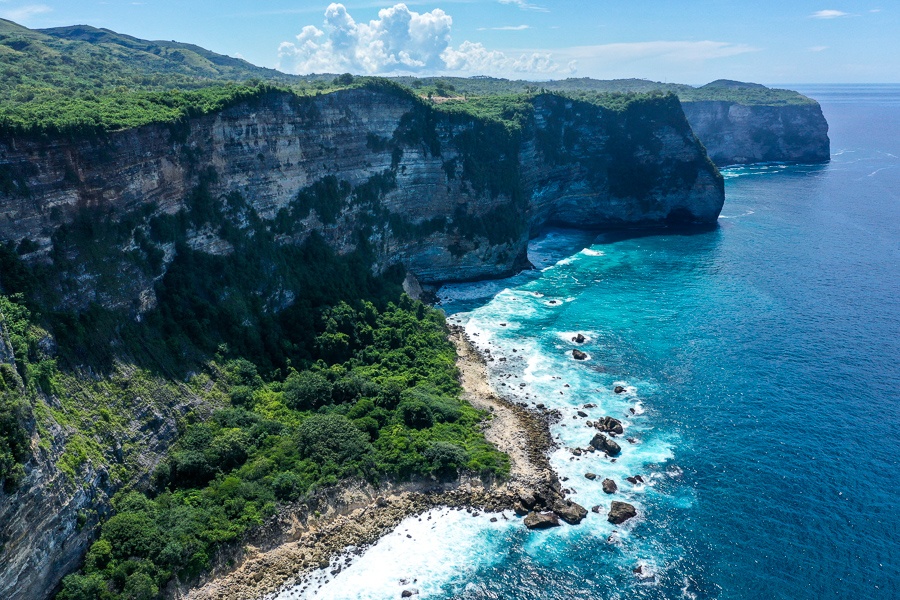
Where Is Nusa Penida?
Nusa Penida is a small island located southeast of Bali, Indonesia. The distance from Bali is about 25 kilometers (15 miles).
Penida has two small neighboring islands sitting right next to it called Nusa Lembongan and Nusa Ceningan, and together these are known as the Nusa islands, but Nusa Penida has become the most famous of the three because of its scenic cliff views and stunning beaches.
How To Get To Nusa Penida
From Bali, the only way to reach Nusa Penida is by speedboat or ferry, with the speedboat journey taking about 45 minutes or so. There’s no airport in Nusa Penida, so the closest place to fly is the international airport in Bali (DPS). You can shop for flights to Bali at Skyscanner.
There are a bunch of speedboat companies in Bali making the trip to Penida daily, and they all depart from Sanur Beach at various times. If you’re staying in Ubud, Canggu, Seminyak, Kuta, or elsewhere in south Bali, you can also drive over to Sanur and catch a boat. Some boat companies include a shuttle service from these areas in their total price.
I wrote a complete guide on how to get to Nusa Penida with one of these speedboat companies if you want to go there independently and arrange everything yourself. It’s more economical than booking a tour package, but also a bit more complicated.
The other option is booking a day tour to Nusa Penida with a Bali-based tour company. This can be a good option if you’re on a tight schedule or want to skip the hassle.
Visiting Nusa Penida Island – Tourist Fee
Since 2023, there’s now an entrance fee for tourists arriving by boat at Nusa Penida, and it’s intended to pay for better infrastructure on the island.
You’ll pay this in cash when you first get off the boat in Penida, and the fee is 25k Rupiah for adults and 15k for children. It gives you entry to all three of the Nusa islands: Penida, Lembongan, and Ceningan.
This ticket also gives you entrance to all of the main attractions and beaches on Nusa Penida, so you don’t have to pay a second fee at Kelingking Beach anymore, for example.
Overall, it’s a positive change, because in the past you had to whip out your wallet and pay a small entrance fee at every tourist spot in Nusa Penida. That was a bit tiresome. Nowadays, you pay once at the harbor and you’re done.
Transport: How To Get Around On Nusa Penida
Even though Nusa Penida is a much smaller island than Bali (with about 4 percent of Bali’s land mass), it’s still not exactly tiny. You can expect to spend hours driving around if you want to see the best sights on each corner of the island.
Just like in Bali, you have two main transport options for exploring Nusa Penida: motorbike rental (self drive), or hire a car and private driver.
Many of the roads in Nusa Penida are still very rough and narrow, so I don’t think motorbikes are a good idea here, although lots of people seem to do it with no issues. Remember to wear a helmet, honk your horn before hills and blind turns, and be prepared to pull over to the side to let cars pass. There’s not a lot of room on the road.
When I visit Nusa Penida I’ve always rented a car with driver (you can book that here) because it’s safer and more comfortable, and the prices are only a bit higher than what you’d pay in Bali for a full day of driving.
Scooters are also easy to rent from your accommodation (or other places) in Penida, and you can expect to pay about 75k Rupiah (~$5 USD) per day with a full tank of gas.
For short taxi trips (like hotel transfers to/from the dock) you can usually arrange those on the spot or with your hotel, although they’re not very cost effective.
Unfortunately the Grab and Go-Jek ride hailing apps are not yet available in Nusa Penida (only Bali), but maybe that will change eventually.

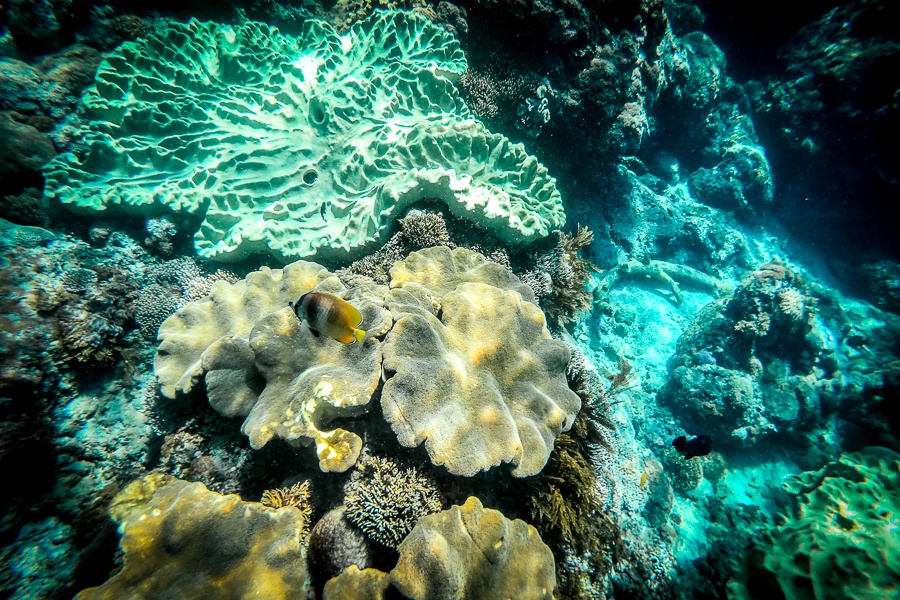
Best Things To Do In Nusa Penida
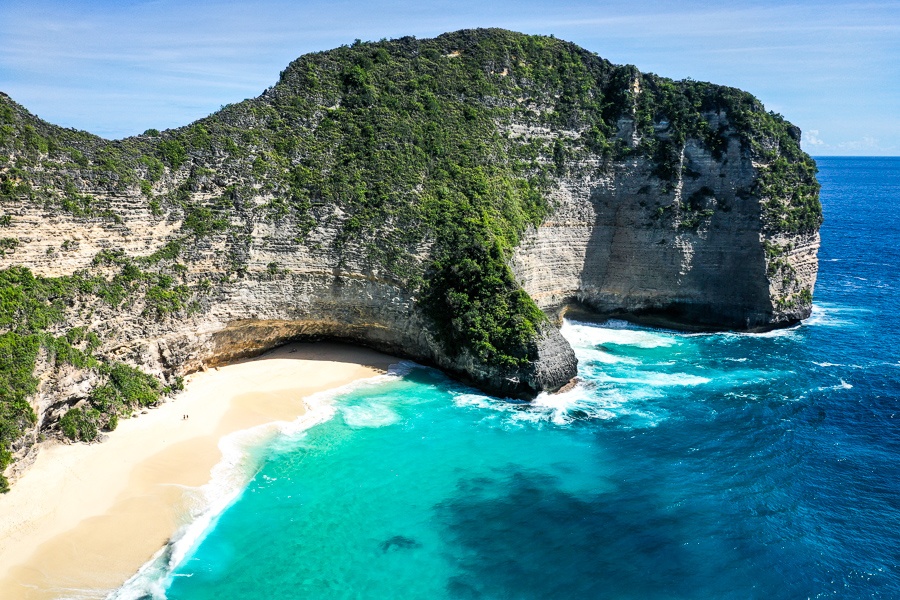
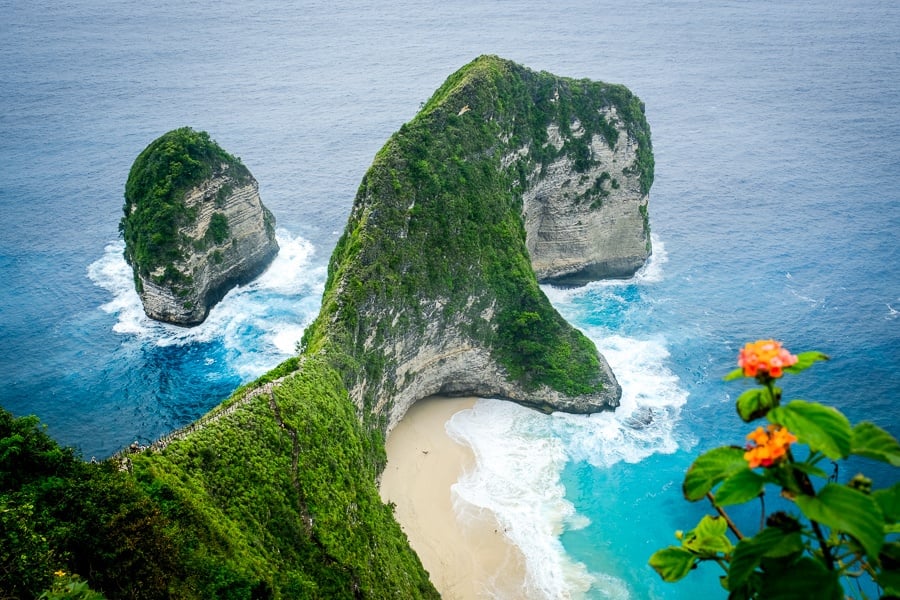
• Kelingking Beach
The Kelingking Cliff is the most famous view in Nusa Penida, and probably one of the most iconic views anywhere in Bali.
This is an incredible ‘T-Rex’ shaped rock sticking out over the ocean, with perfect turquoise water splashing around it. The first time you look over the edge of the cliff and see this view, it really is breathtaking!
After you’re done admiring the scenery at the Kelingking Cliff, there’s also a path to go down to the beach at the bottom.
The hike down to the beach is a major workout, a bit scary, and takes at least two hours roundtrip, but you’re rewarded with one of the best white sand beaches in Nusa Penida Bali.
• Paluang Cliff Viewpoint
Everyone goes to Kelingking Cliff, but there’s another spot located very close to it with its own amazing scenery, called Paluang Cliff. It’s just a 5 minute drive from Kelingking.
Paluang may not be as well known as Kelingking, but that’s part of the appeal. It’s a great alternative spot that gives you views of the Kelingking T-rex from the other side, without the crowds.
There are swings and photo platforms at the Paluang Cliff, plus a Balinese temple with a quirky car shrine, called the ‘car temple’ of Nusa Penida.

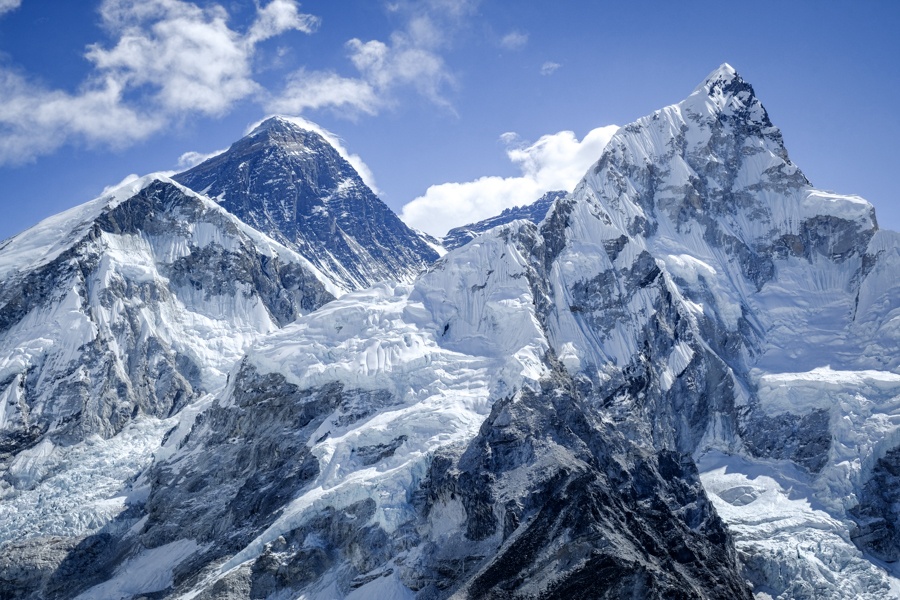
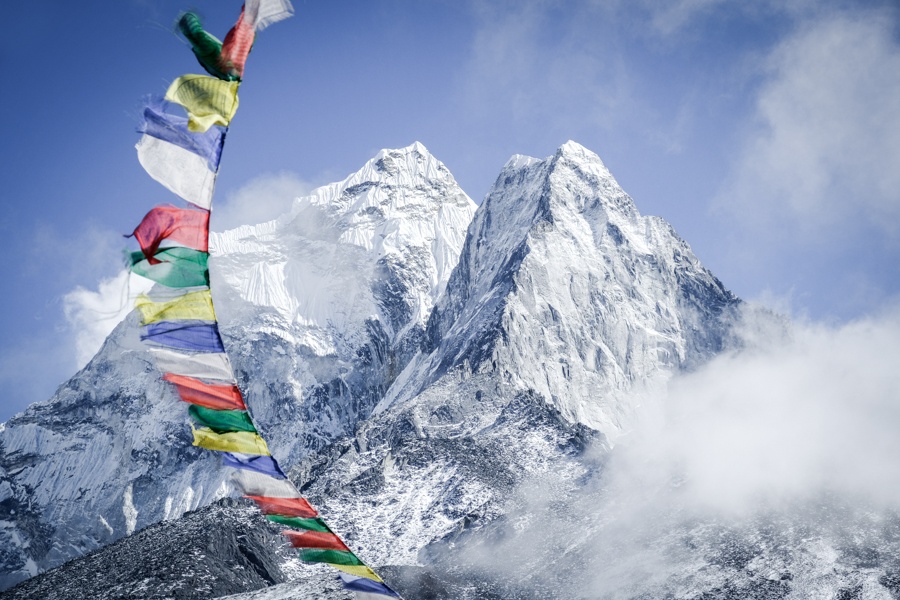
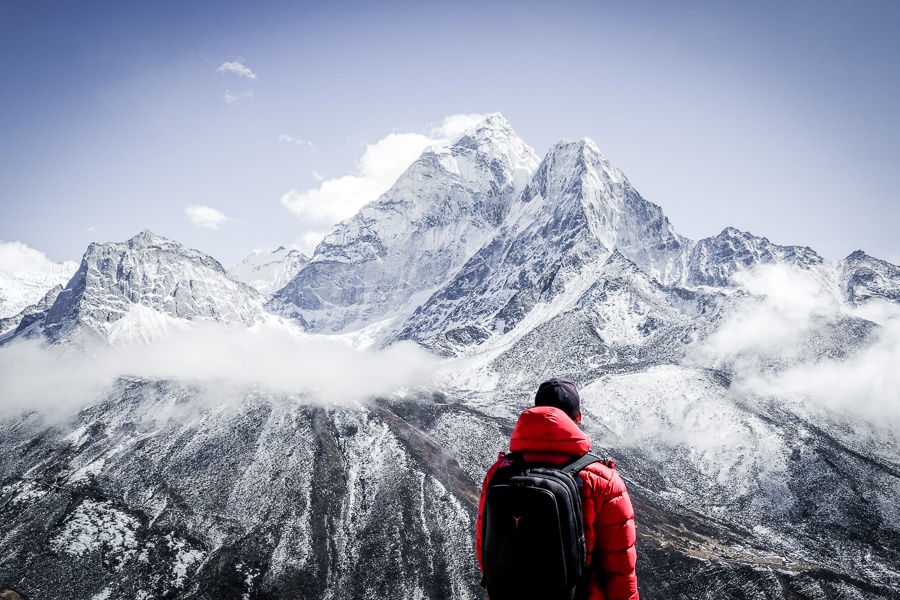
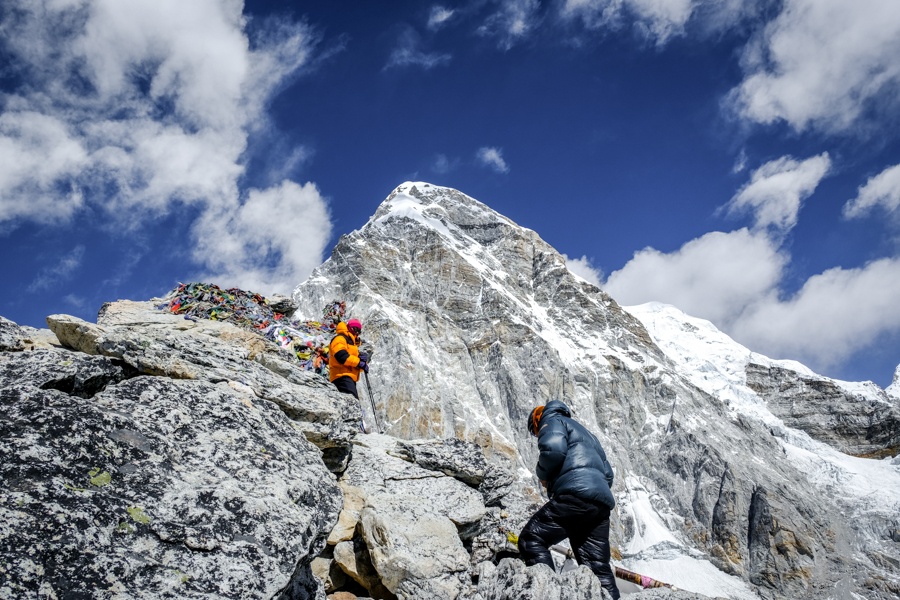
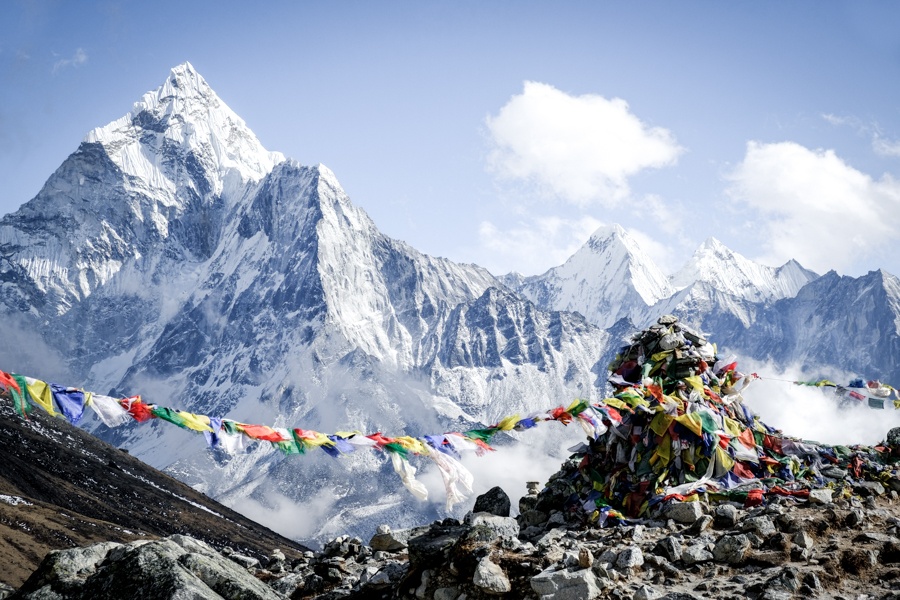
The Mount Everest Base Camp trek in Nepal is one of the world’s best bucket list hikes. In less than 2 weeks, you can trek to the foot of Mt Everest and other snowy peaks in the Himalayan mountains.
The good news is that it’s not a super difficult hike, and you don’t need a big budget to do it. It’s worth it for the fun and accomplishment alone, but you also get views of the Himalayas that are out of this world.
This travel guide will explain how you can do the EBC trek independently (with or without a tour guide), along with a recommended packing list and everything else you need to know before you go!
Best Everest Base Camp Tours
First of all, if you’d rather skip the hassle of planning your own EBC Trek, Klook has Everest Base Camp Tours starting as low as $900 USD for a full 12-day trek.
You may be able to find something cheaper than this once you land in Kathmandu, but booking online with a vetted tour company has some big advantages, and the reviews on their website are very positive.
We’ve used Klook for lots of tours and activities around the world, and they’re great! Highly recommended.

When To Do The EBC Trek
The Mt Everest region has 4 different trekking seasons:
- March – May: High season. Best weather, with stable temperatures and bright sunny days, but the trails can get crowded. During these months you may share the EBC trail with pro climbers on the way to go summit Everest.
- June – August: Monsoon season. There’s a lot more rain during these months, and the trails are mostly empty.
- September – October: Clear days and busy trails. This is one of the most popular trekking seasons.
- November – February: Coldest season, but the weather is stable and dry. The trails are mostly clear.
I trekked in early February, and even though it was nice having the trail mostly to myself, the cold in the evenings and mornings was straight up misery.
If I could go back and change it, I would definitely do my hike later in the season.
Weather At Everest Base Camp
Temperatures on the Mt Everest Base Camp trek can range from 5 °C (40 °F) to 20 °C (70 °F) depending on month, and as low as -30 °C (-22 °F) at night during the winter months.
If you trek during the warmer months (Mar-May and Sep-Oct), the cold is not a big problem and shouldn’t be hard to cope with. Winter is a different story. Your snot will freeze in your nose at Gorak Shep.
Sunshine is key for winter trekking in Nepal, and thankfully you should have lots of sun in most months outside of the monsoon season. On my February hike, I often found myself shedding all my layers while trekking because I was heating up in the sun.
If you do your Everest Base Camp hike during the winter, the biggest issue is staying warm in the evenings and at night. For this, you’ll definitely want a top quality down jacket and sleeping bag.

All About Everest Base Camp Trekking
My Itinerary
- Day 1: Kathmandu to Lukla to Benkar.
- Day 2: Benkar to Namche Bazaar.
- Day 3: Namche Acclimatization Day.
- Day 4: Namche to Phortse.
- Day 5: Phortse to Pangboche.
- Day 6: Pangboche to Dingboche.
- Day 7: Dingboche Acclimatization Day.
- Day 8: Dingboche to Thukla.
- Day 9: Thukla to Gorak Shep.
- Day 10: Everest Base Camp.
- Day 11: Kala Patthar to Gorak Shep to Pheriche.
- Day 12: Pheriche to Namche.
- Day 13: Namche to Lukla.
What To Bring: Packing List
This isn’t a complete list of everything to bring on a Mt Everest Base Camp Trek, and you may have to change things up a little depending on what month you go, but these are just some of the basics.
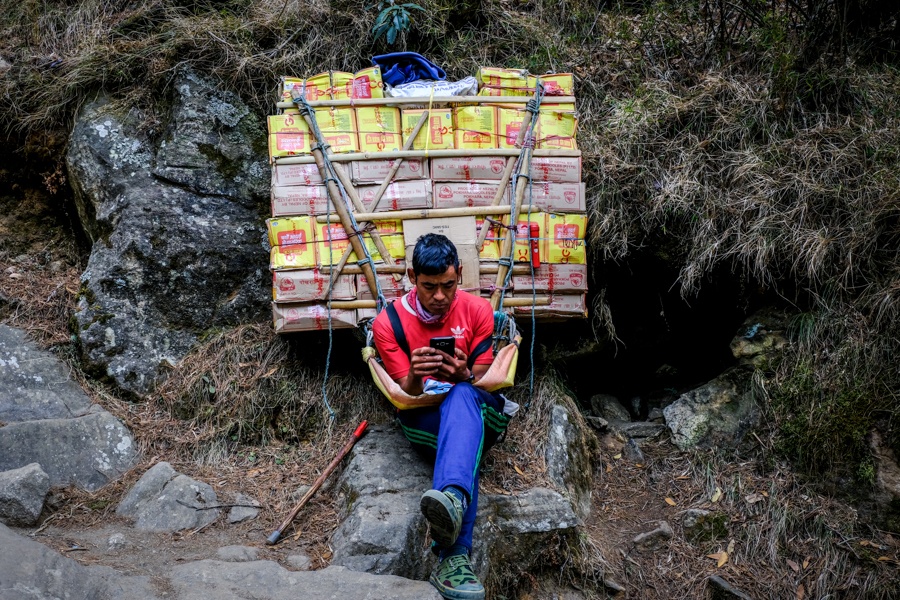
You can find most of this gear in Kathmandu, but in my opinion you’ll get higher quality and a wider selection if you order online.
- Beanie: I only wore this at night, but it definitely helped keep my ears warm.
- Down Jacket: Bring the biggest, warmest DJ possible. This is your most important piece of gear. You can use it as an extra cover at night.
- Fleece Sweater: This is the only jacket you’ll need to wear while trekking most days, especially if it’s sunny.
- Shirts: Something comfy with quick dry material.
- Trekking Pants: Something lightweight and breathable.
- Thermal Underwear: May not be needed if you trek in the warmer months.
- Gloves: I only wore these at night, but they definitely helped keep my hands warm.
- Socks: Merino wool is best for staying warm and stopping moisture.
- Headlight: It’s smart to have one just in case. I like this headlight from Bushnell or this one from Streamlight.
- Tumbler: 1 liter water bottle to refill daily on the trek.
- Sunblock: It’s easy to sunburn at high altitudes. A small bottle is plenty.
- Sunglasses: Good for snow. May not be necessary unless you plan to hike a mountain pass like Cho La.
- Hat: I wore old faithful throughout the hike.
- Watch: An altimeter watch would be fun to play with here.
- Camera: Duh. You can’t do the Mt Everest Base Camp Trek without taking lots of pictures.
- Power Bank: Bring a big power bank and you might only need to recharge it once on the whole trek.

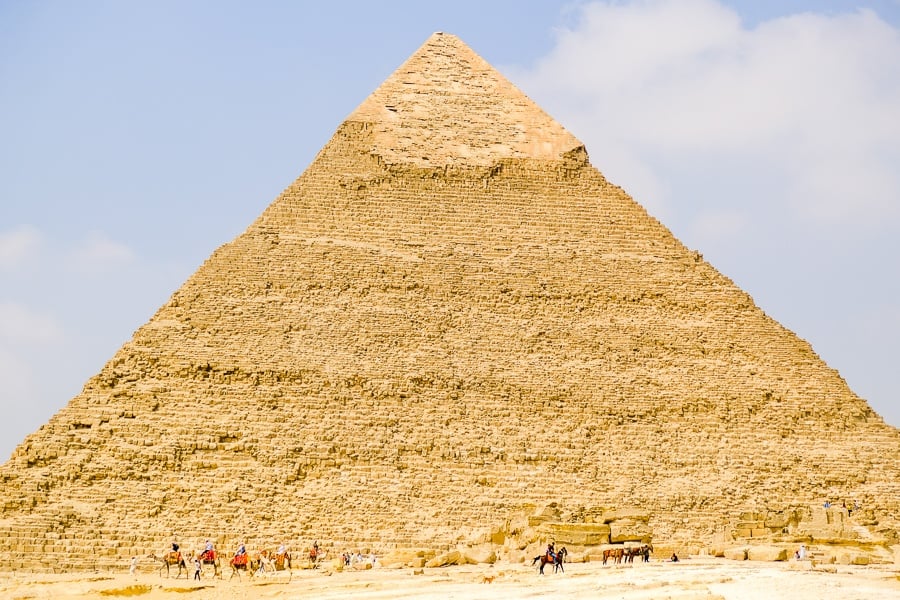
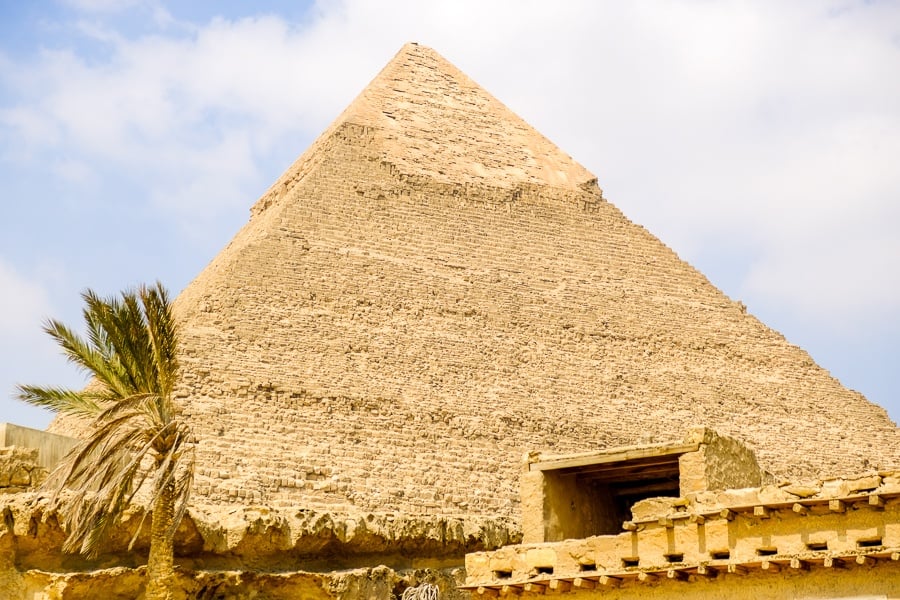
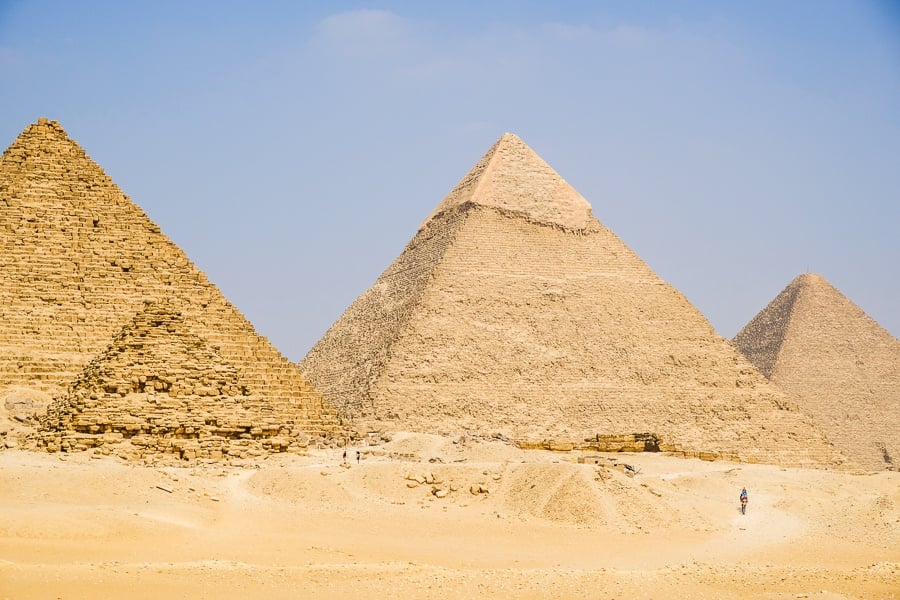
What kind of bucket list doesn’t include the Great Pyramids of Giza in Egypt? Believe it or not, the Giza pyramids are fairly easy to visit on a day trip from Cairo, the capital of Egypt.
Built in 2560 BC, the Great Pyramid of Giza was the tallest man-made object in the world for 3,800 years. It’s the oldest of the Seven Wonders Of The Ancient World, and the only one still standing today.
Visiting the Egypt pyramids is a pretty simple experience, and there’s not a whole lot to do there except gaze at the big piles of rock, but it’s still a profound and unique experience that every traveler should check off their list.
This travel guide will explain how you can visit the Egyptian pyramids on your own, with or without a tour, and with a very modest budget and minimal planning!
Quick Facts (Main Pyramid)
- Date: 2560 BC
- Height: 150 meters (500 ft)
- Base Length: 150 meters (500 ft)
- Weight: 6 million tons
- No. of Blocks: 2.3 million
- Builders: 200,000+
Best Day Tours To The Egypt Pyramids
First of all, if you’re on a tight schedule and want to skip the extra steps involved in arranging your own trip to the pyramids, or if you’d rather travel in a tour group for safety or convenience, there are options for doing that.
There are a number of companies that offer prearranged day tours to the Pyramids of Giza and the Sphinx for as low as $45 USD, complete with hotel transfer, optional camel ride, and same day return to Cairo.
If you’d rather make your own arrangements and go without a group, that’s covered next.

How To Get To The Giza Pyramids
The Great Pyramids are located on the outskirts of Giza, a suburb of Cairo, Egypt.
The nearest airport is the Cairo International Airport (CAI), which is served by a bunch of international airlines. You can shop for flights to Cairo at Skyscanner.
From the Cairo airport, it’s a 1 hour drive to Giza. The arrivals zone has plenty of taxis you can take, but I used Uber and I would highly recommend this because it’s much cheaper and probably safer too.
Do not rent a car in Egypt unless you are familiar with driving in the Middle East! Traffic in Arab countries is dangerous and chaotic, and you’ll be much better off going with a driver who’s familiar with how the traffic works here.
Besides, the drivers in Egypt are pretty affordable — as of 2026, the price for an Uber ride from Cairo to Giza can be as low as 340 EGP (~$7 USD).
Giza Pyramids: What To Expect
If you’re staying at least one night in Giza, which I’d recommend, then you can drop off your luggage first at your hotel and then easily walk to the entrance of the pyramids and sphinx.
There are a bunch of hotels in Giza that are within a 5 minute walk to the main entrance for the pyramids, and they usually have great rooftop views to boot. More on that later.
If you’re ready to visit the pyramids, then just head up to the main ticket office and buy your tickets. The scammers and touts will already be trying to chat you up at this point, but you should ignore them.
As of 2026, the general ticket price is 700 EGP (~$15 USD) and that gives you admission to the sphinx and the whole area surrounding the pyramids.

If you plan to go inside the pyramids themselves, as opposed to just walking around and looking at them on the outside (which is what I did), then you’ll need to buy an extra ticket.
Personally, I don’t think it’s worthwhile. The temperature in there can be stifling hot, and the insides were emptied by grave robbers a long time ago.
It’s a better idea to save this money and spend it on a visit to the Egyptian Museum or some of the attractions at Luxor, where you can still see the elaborate tombs and gold artifacts.
Anyways, at this point you’ve reached the pyramids and bought your tickets. The security checks at the entrance are pretty brief, and the lines don’t take very long.
Just watch your belongings. One time I had cash stolen from my wallet while it was slowly making its way through one of these x-ray machines in Egypt.
You’ll need to decide whether you want to go see the sphinx first, or the pyramids.
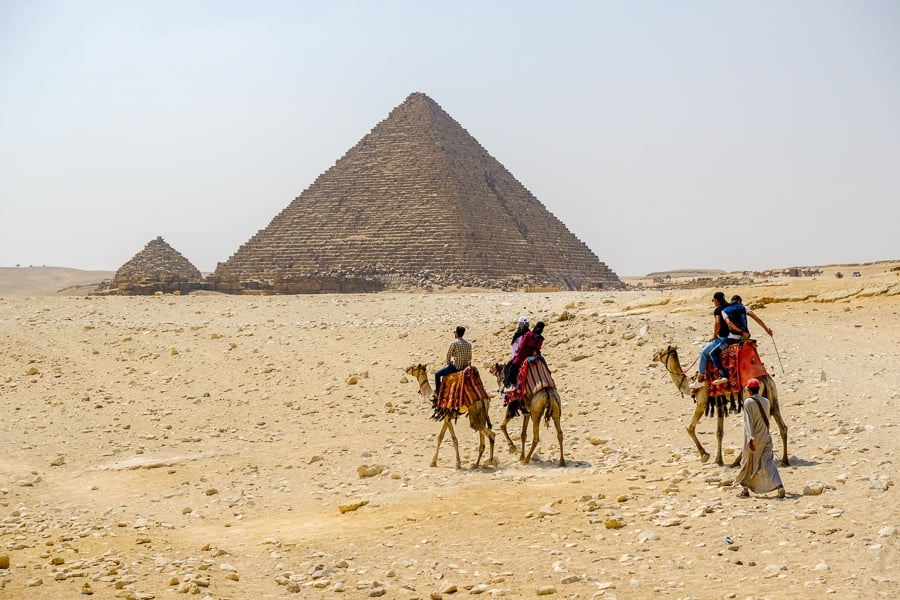
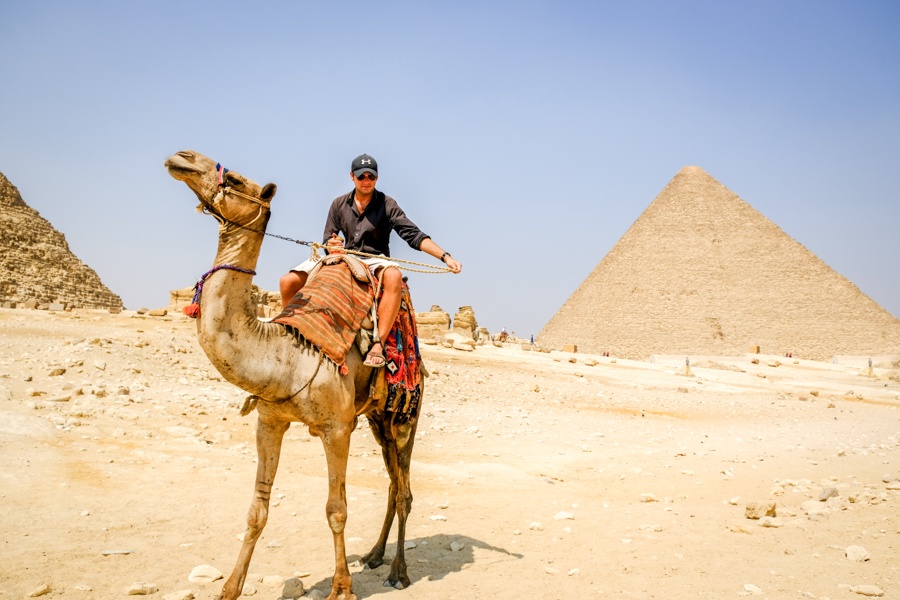
The sphinx is near the entrance, while the pyramids are a 15-20 minute walk away from the entrance. I’d recommend doing a camel ride to the pyramids, then you can loop back around and stop near the sphinx on your way out.
Don’t get scammed! Giza is full of scammers and very aggressive touts (sellers), just like all of the tourist areas in Egypt.
You should prepare to be harassed like crazy by shady people telling you that you can’t walk around the pyramids without a guide (not true), that you are in great need of some service they offer (not true), or that their particular camel rides happen to be the absolute best in the business (okay, maybe).
I agreed to a camel ride and then the guy tried to put me on a horse instead, saying it was just as good — uhhhh no deal. Just be firm, and tell them you won’t pay unless you get what you’ve agreed to.
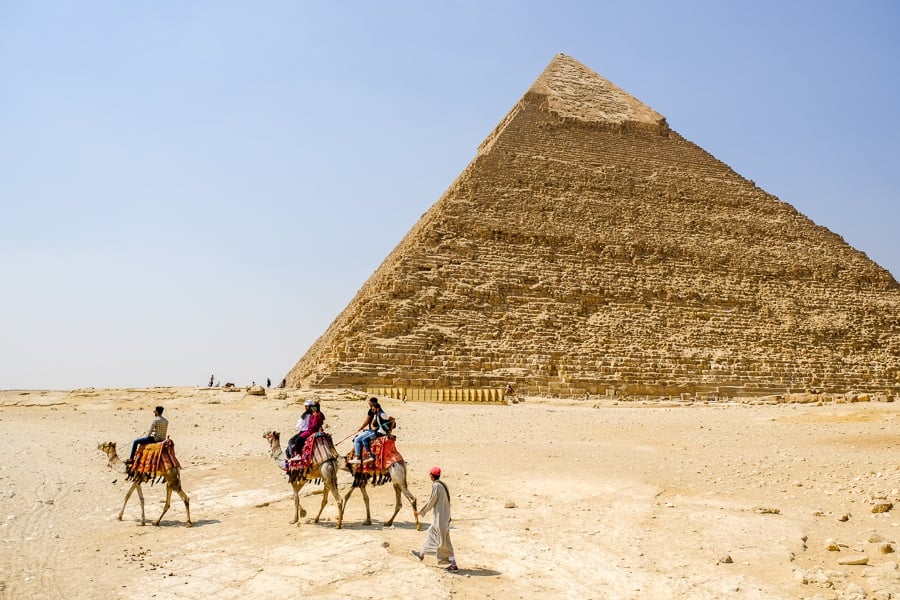
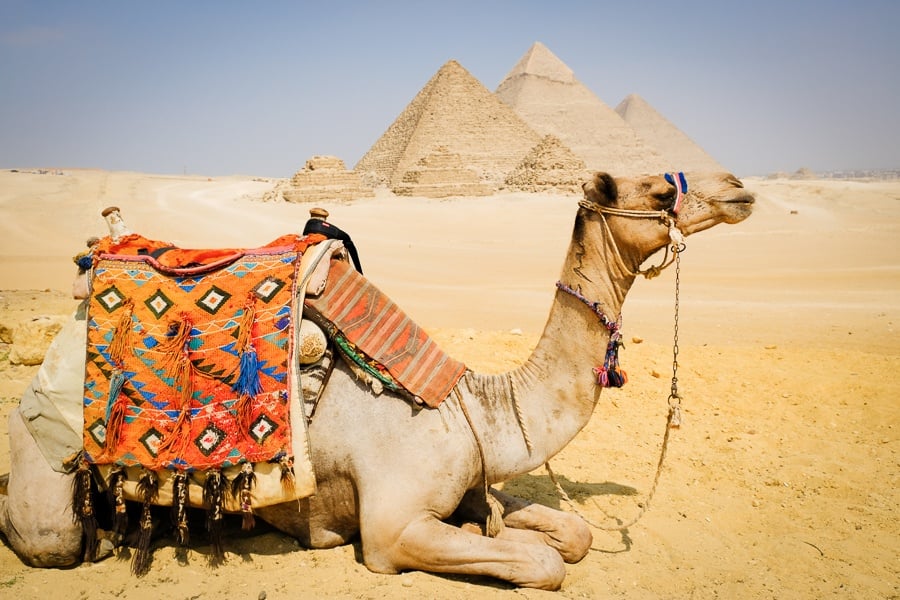
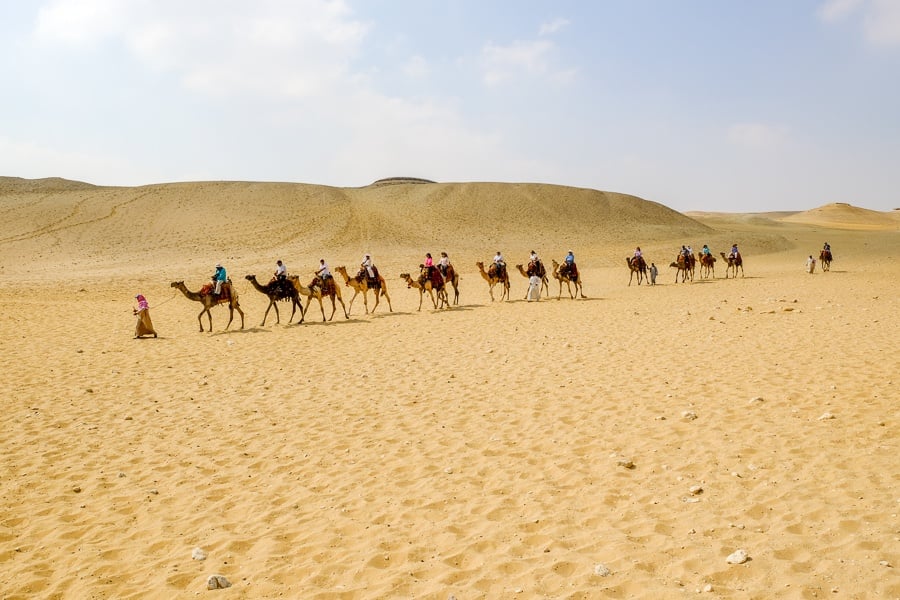
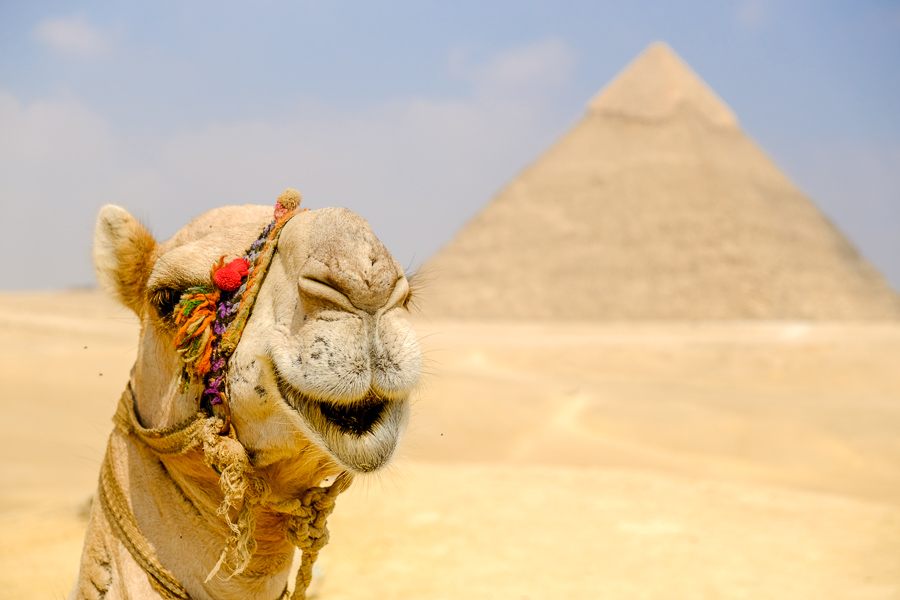
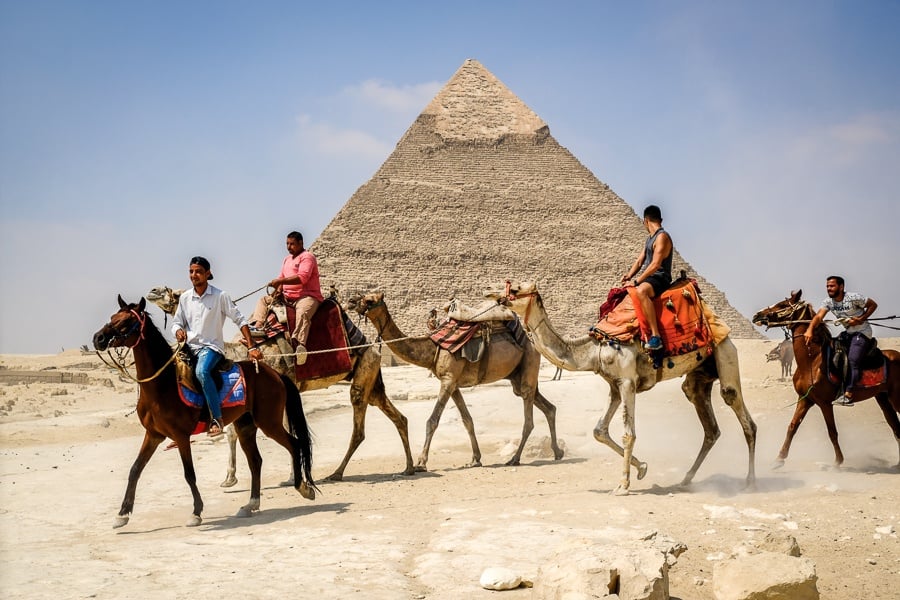
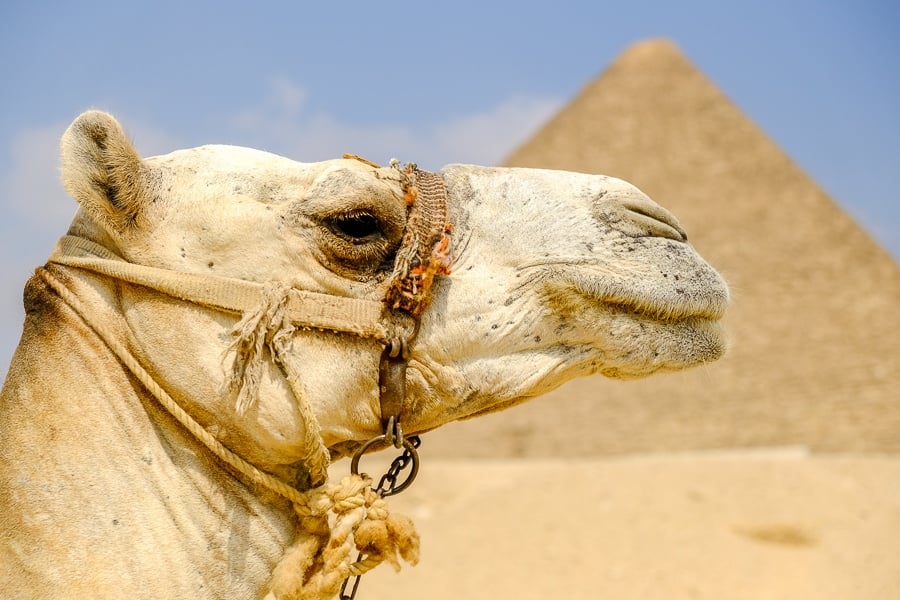
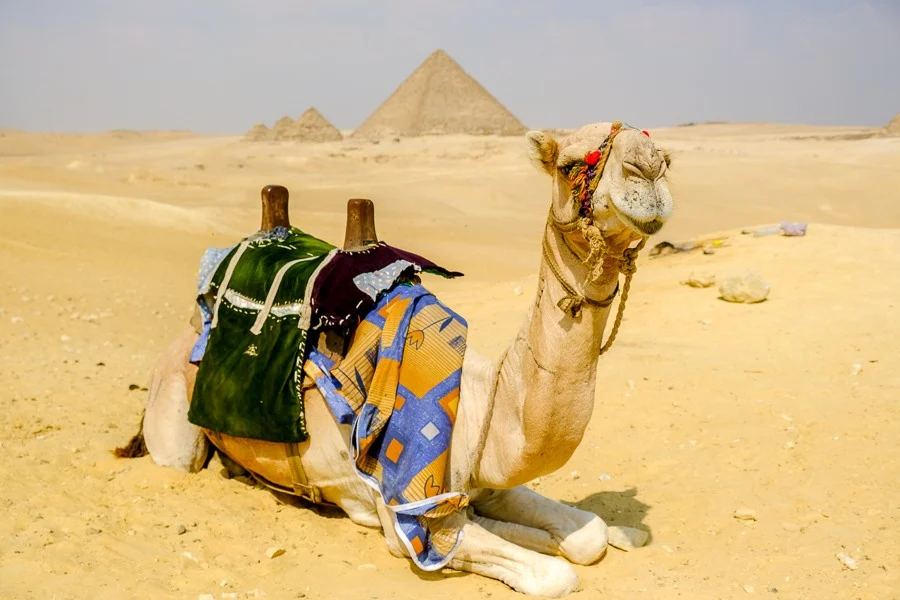
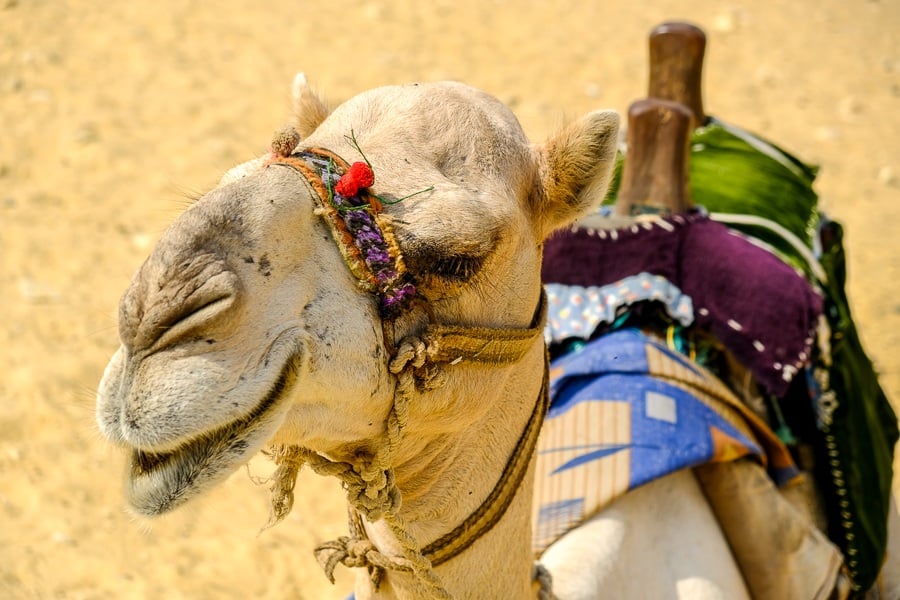
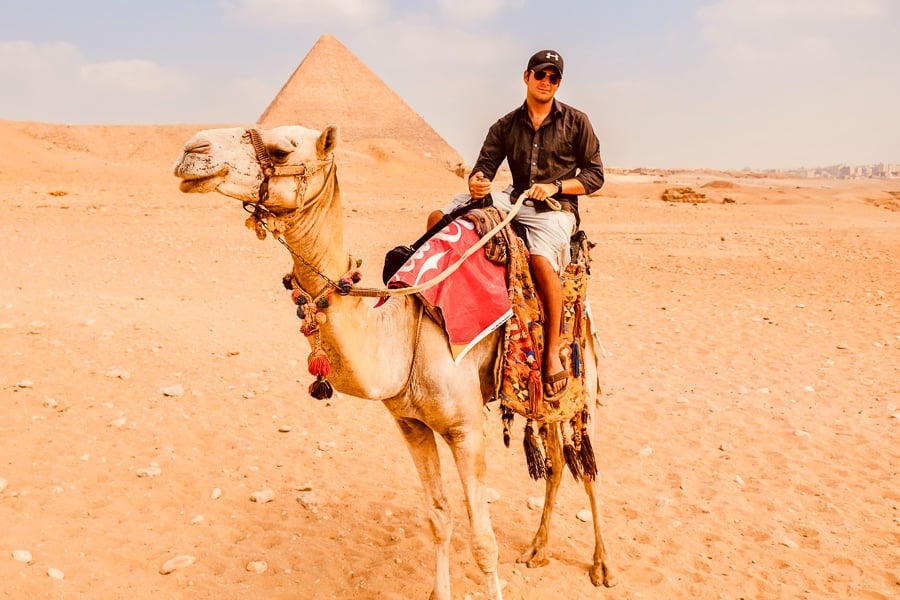
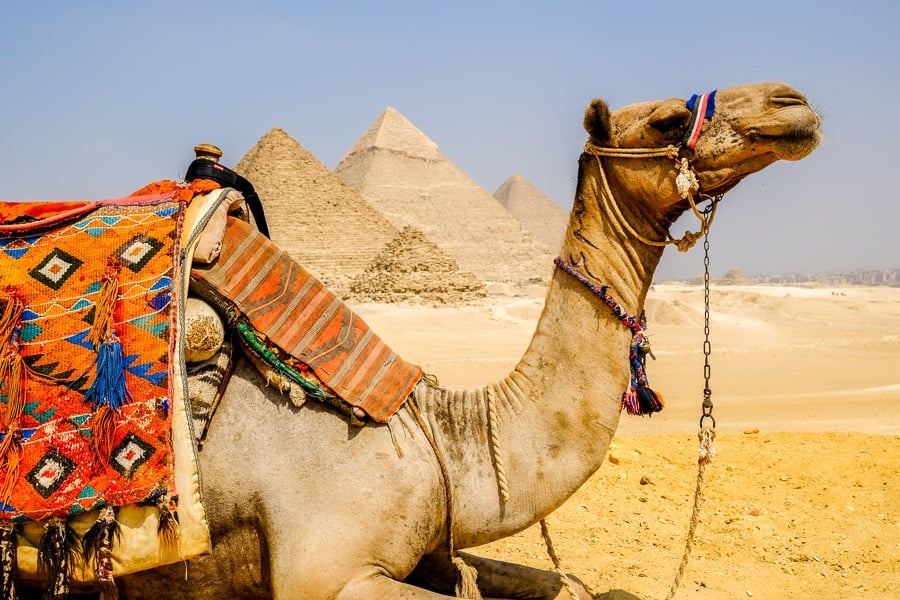
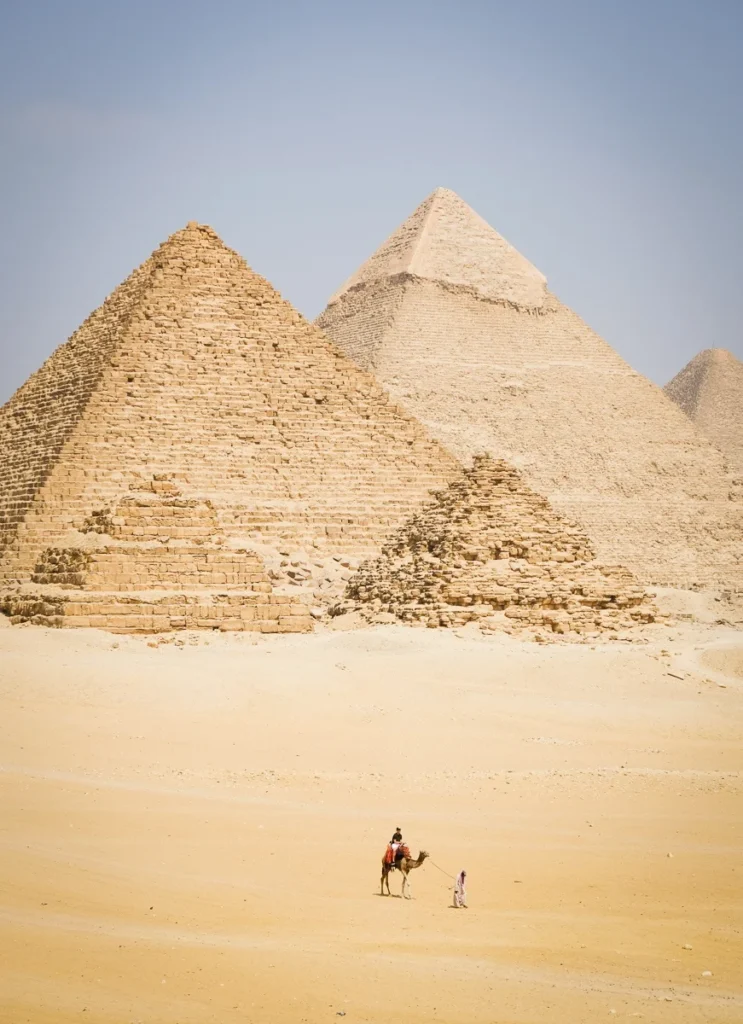
Camel Rides At The Egypt Pyramids
If you do go on a horse or camel ride, which I think is a great idea, then be sure to negotiate your price and terms BEFORE hopping on.
It’s common for the touts to try to come up with ridiculous prices after you’re already in the saddle and feeling obliged.
Do not pay before your ride either, handle the payment after your ride — no matter what they say!
The government of Egypt has a fixed price for the camel rides listed on a sign near the entrance, so you can always point to that if you’re having a hard time getting a fair price from the touts.
You can also ask your guide to take some pictures of you on the camel using your camera, but be prepared to tip for this; adding an extra 50 EGP is probably fine.
Your guide might demand much more, and may get rude or pushy and aggressive, but that’s how it is with everything in Egypt.
Just negotiate a price beforehand, and stick with it. Even the most aggressive touts will back down when they see that you won’t. This is a normal part of life and travel in Egypt.
By the way, 50 Egyptian Pounds is a great price for a camel ride.
I’ve traveled all over the Middle East, and I can say that the camel ride at Giza is MUCH cheaper than what you will pay in more developed places like Dubai or Oman! In other words, if you’re wanting to ride a camel, this is probably the best place in the world to do it.
I took two camel rides at Giza, one 30 minute and one 60 minute, and they were both awesome. Camels are a bit scary to ride because you sit so high above the ground, but it’s still a great experience.
Plus, you can tell people about that time when you rode a camel at the Great Pyramids of Egypt — epic stuff!
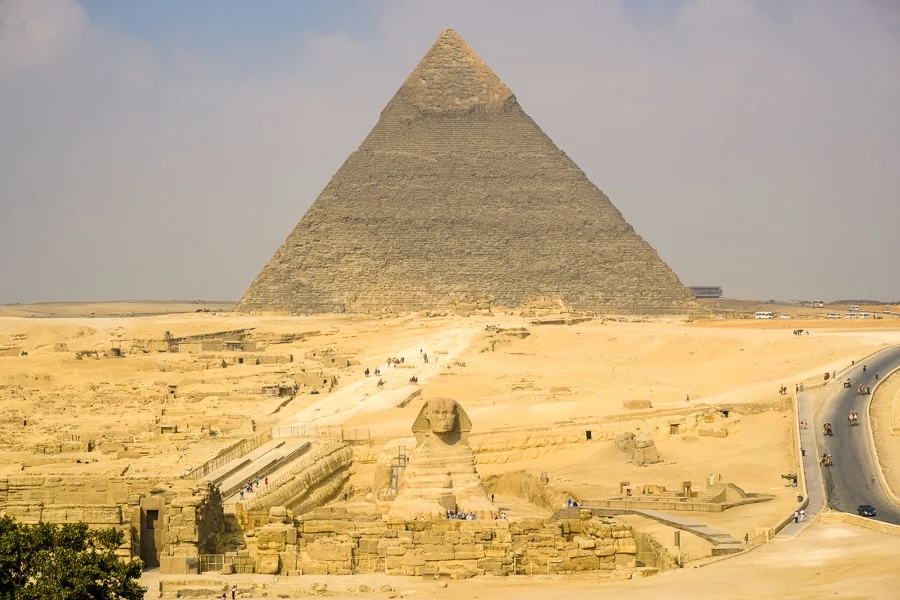
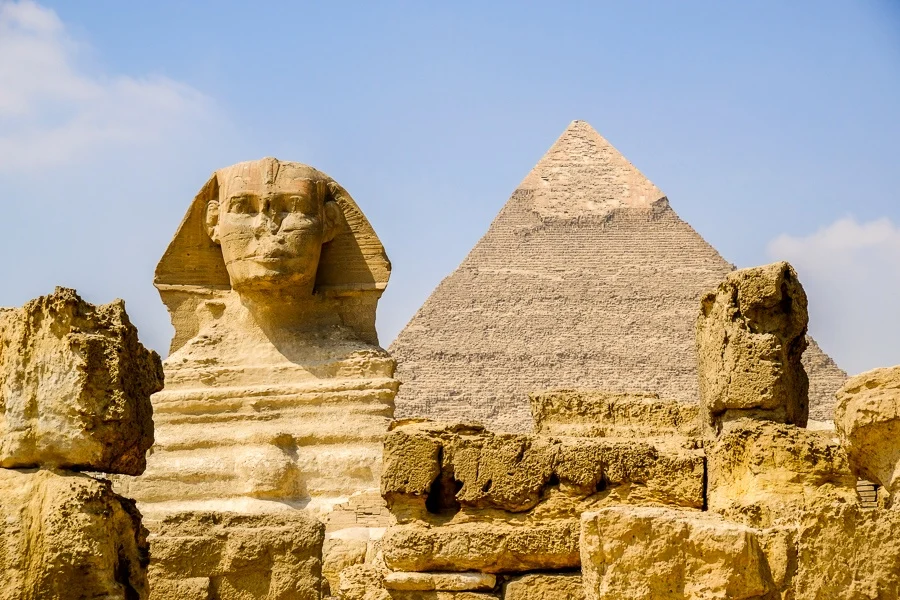
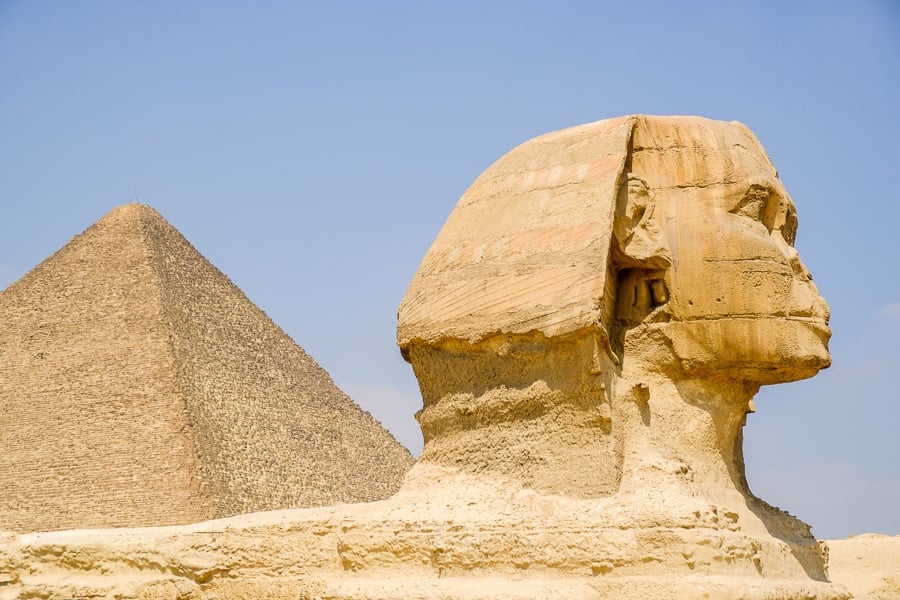
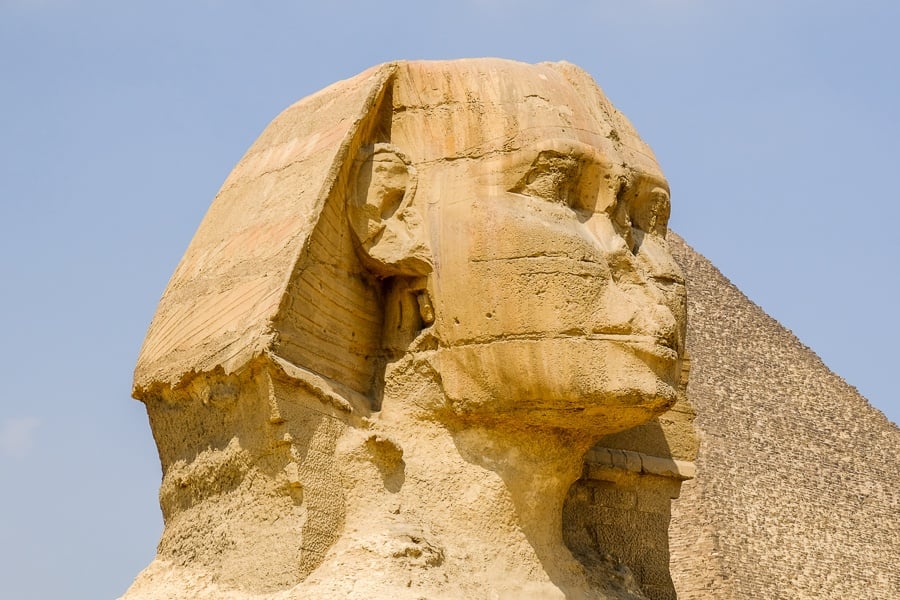
The Great Sphinx of Giza
Don’t forget to stop at the Great Sphinx too.
This mythical creature, with the body of a lion and the head of a pharaoh, is the oldest surviving sculpture in Egypt.
It’s also included in the same 120 EGP ticket you bought at the entrance for the pyramids, so just show your ticket at the doorway to the sphinx and you can walk up to it.
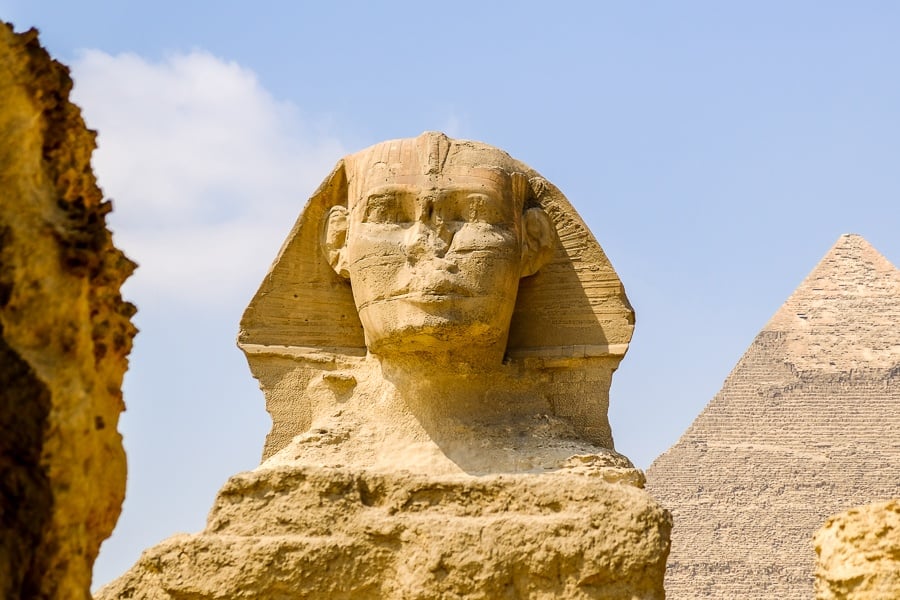
On the outside, there’s also a great photo spot near the gate, where you can take a frontal shot of the sphinx and Pyramid of Khafre together (seen in the pic above).
Sadly when I visited, I wasn’t able to get a full profile shot of the sphinx’s body and paws since it had some scaffolding on it, but I think that was because of U.S. first lady Melania Trump’s visit, expected the following week.
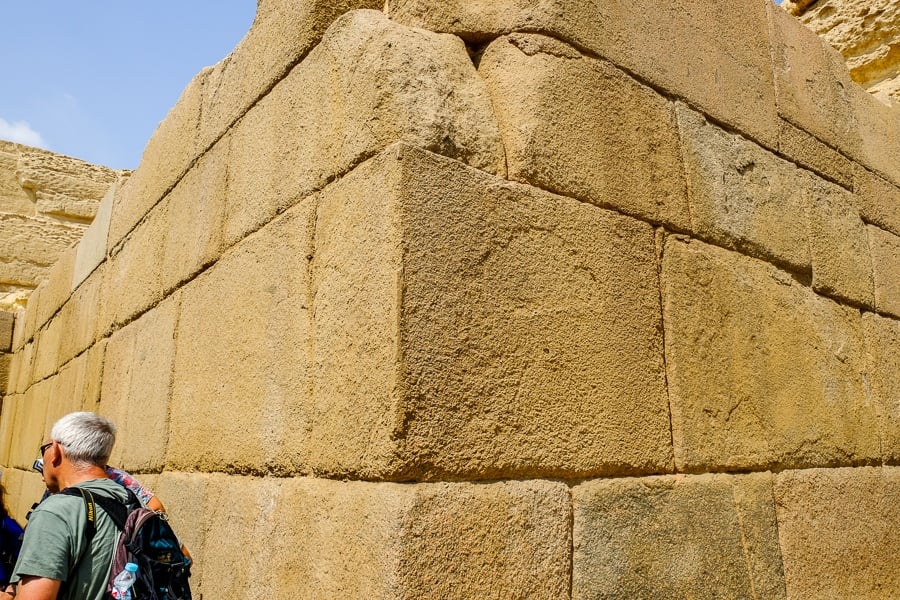
Also take a minute to check out the massive stone blocks in the entryway! The weight of these blocks must be insane.
Hotels Near The Egyptian Pyramids
There are a bunch of neat hotels in Giza that are within a 5 minute walk to the main entrance for the pyramids, and they usually have awesome rooftop views of the whole area.
I would highly recommend staying at least one night in Giza, because it allows you to go at a relaxed pace and make the most of your time there.
It also makes it easy to do the Sound & Light Show, or just sit back and watch the sunset at Giza.
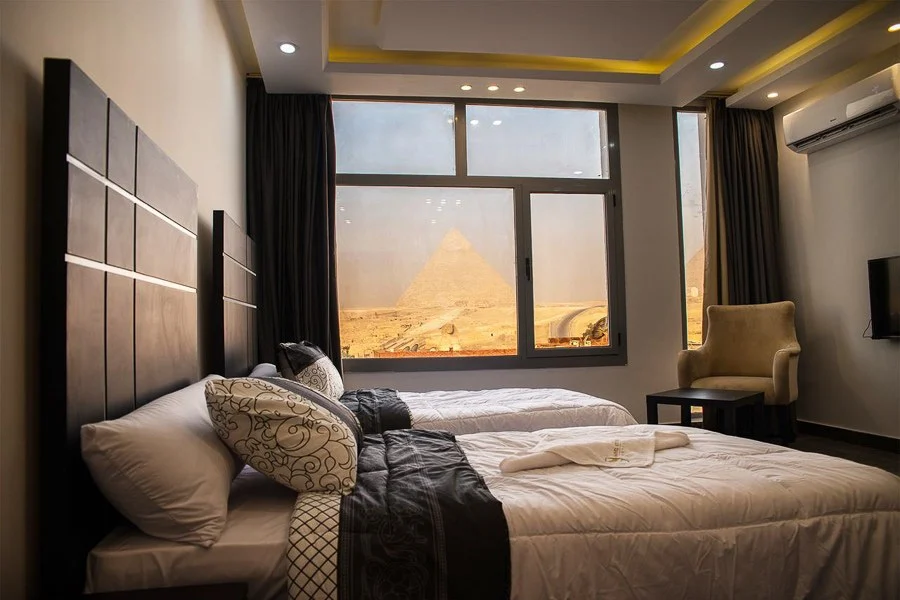
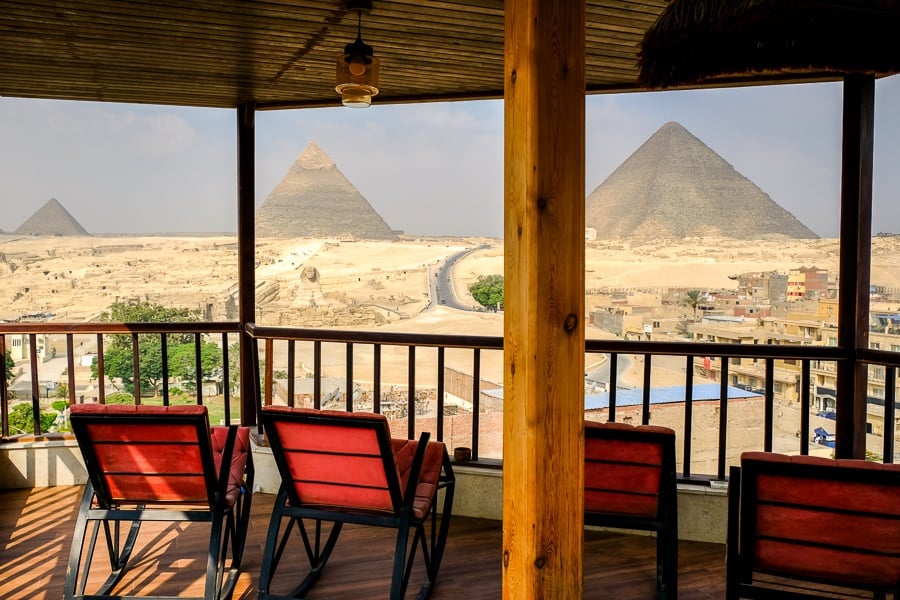
I stayed at Marvel Stone Hotel for $32 USD/night, and it had a great rooftop terrace with views of the pyramids and sphinx, complete with easy chairs and even a pool table.
This was actually one of the highlights of my trip to Giza, because I was able to sit back and admire the pyramids and the camels running around in the distance — without being harassed by sellers and touts.
In the evening I watched the sunset over the Pyramid of Khafre and took some photos from the rooftop.

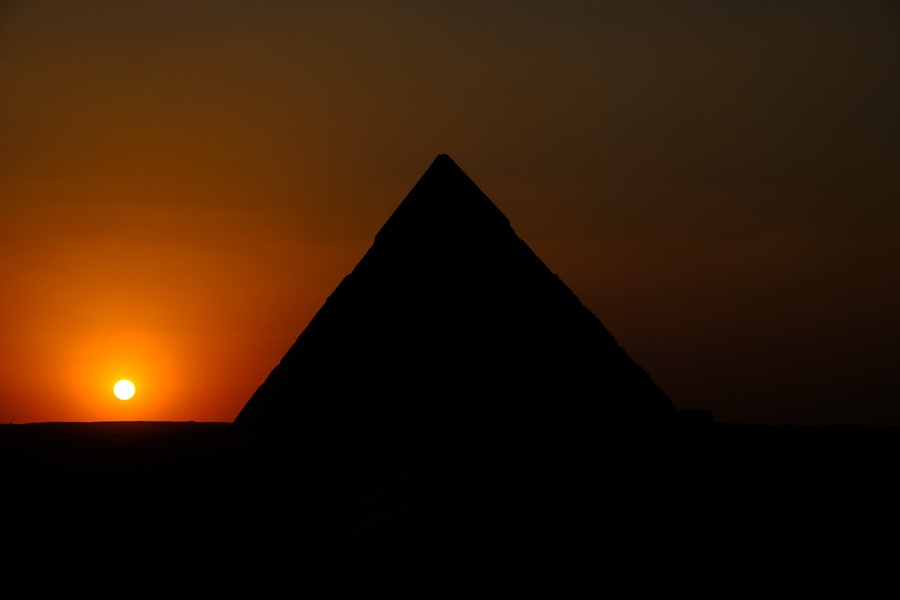
When Is The Best Time To Visit The Giza Pyramids?
Egypt has an arid climate, so it’s hot and dry year round.
The coolest months are from December to March, and this is probably the most popular time to visit the pyramids, but honestly any month in the spring or fall would also be fine.
I visited Egypt in September, and the heat was bad at times (mostly in Luxor), but I didn’t think it was too much of a problem in Giza. Northern Egypt is not nearly as hot as nearby Middle Eastern countries like Qatar or the United Arab Emirates.
You can take photos of the pyramids in the morning, but the dust will obscure the colors a bit. The best time of day for taking photos at the pyramids is around noon, when the dust clears up and the blue sky can be seen in the background.
Older Posts